• Youtube
  • LinkedIn
  • Mail
  • Back to ApliCAD.com
Llámenos +34 964724870
BIM ApliCAD
  • Home
  • Products
    • UpdateBIM Private Cloud
      • Ayudamos a las organizaciones a la estandarización de los objetos BIM que se usan tanto para los colaboradores internos como externos
      • Share
      • Privately share your BIM components and make sure everyone is using the latest versions.
      • Docs
      • Add any type of document to the families to be consulted from the design environment.
      • UpdateBIM Private Cloud Price
    • UpdateBIM Manufacturer
      • We assist creators of building products and interior design products in expanding their professional reach, increasing their involvement in projects and making more strategic choices.
      • Publish
      • Make your products and information globally accessible
      • BIM content development
      • Transform your products into digital with the support of our expert content creation team.
      • Price UpdateBIM Manufacturer
    • CTE HULC
      • Plugin in Revit to export 3D model information including materials to the HULC calculation program.
      • Price CTE HULC
  • Projects
  • Downloads
  • Documentation
    • UpdateBIM
  • News
  • Contact
  • English
    • Español
    • English
  • Search
  • Menu Menu

How can we help you?

UpdateBIM

55
  • News
    • News 3.0.2
  • Modify parameter values
    • Change Parameter Value from Web Interface
    • Which values can be modified
    • Mass Update
    • New Mass Parameter
  • First Steps
    • First access to UpdateBIM
    • Free UpdateBIM License
    • Having a business account
  • Configuration
    • Login – Registration in the plugin from Revit
    • Change the plugin interface language
    • Email sent to your account manager
  • Cloud Access
    • Use the filter to find the right family
    • Select a family to insert it into the project
    • Insert only the selected type
    • Use families with types in a .txt file
    • Insert Groups
    • Use tags to classify
    • Access to the Web environment from Cloud Access
    • Insert Families from the Web Environment
    • Access Additional Information Before Inserting
    • Use of Folders
  • Analyze Project
    • Analyze Project
    • Update the selected family
    • Update All
    • Select and Locate Families in the Project
    • Special Case with Groups
    • Inserting Families from the Analyzer
    • Using Filters to Enhance Analysis
  • Content Manager
    • Content Manager
    • Adding a New Family to the Catalog
    • Update Existing Family
    • Add a Group to UpdateBIM
    • Update a Group in UpdateBIM
    • Bulk Upload
    • Create Folders from Revit
    • Publishing from the Web Environment
    • Delete a Family
  • Materials
    • Add Finishing Materials
    • Placing Materials on Floors, Walls, and Roofs
    • Changing Materials
    • Analyze Materials Included in the Project
  • Web environment
    • Login – Registration from the Web Environment
    • Recover Password
    • Payment Account – Manufacturer
    • Payment Account – Private Cloud
    • Create and Manage Folders
    • Catalog and Multilingual Information
    • Create and Manage Tags
    • Invite Users in Bulk
    • Generate Links for Use on Other Websites
    • Using the Shared Parameters File
    • Usage Statistics
    • Economic Management of the Catalog
  • Documents
    • Add Documents Associated with Families
    • Use Type Information
View Categories

Placing Materials on Floors, Walls, and Roofs

The integrated cladding materials system in UpdateBIM allows you to select the desired material from the catalog by following these steps:

1. Prepare the Project: #

Before selecting the material, ensure the project includes one of the construction solutions to which the materials will be applied, such as floors, walls, or ceilings.

2. Select the Material from the Catalog: #

Next, choose the material from the catalog. For this example, we will use a material from the public catalog of AZTECA Ceramics.

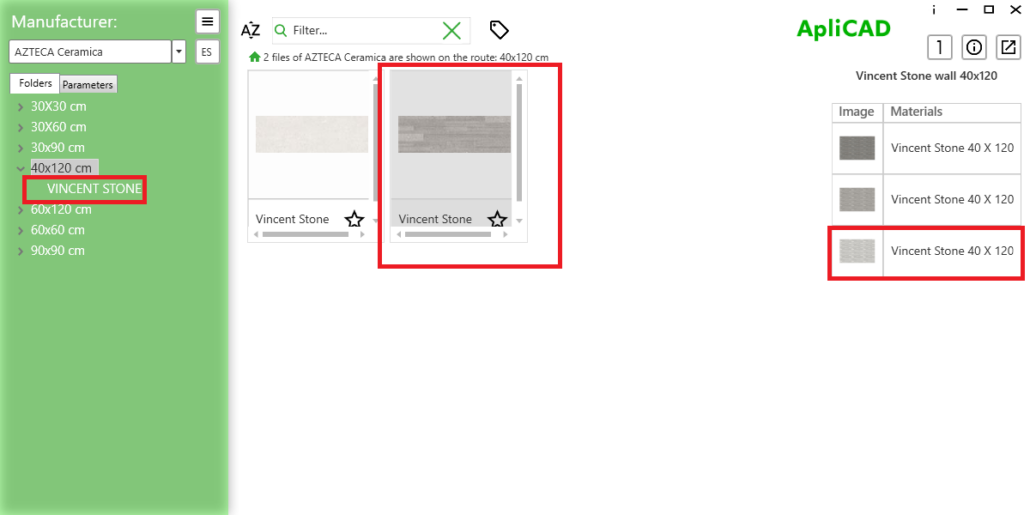
For instance, select the material indicated in the image. Once the type of material is selected, the program will prompt you to choose an element to apply it to.

In this case, we will select a floor specifically created for this occasion.

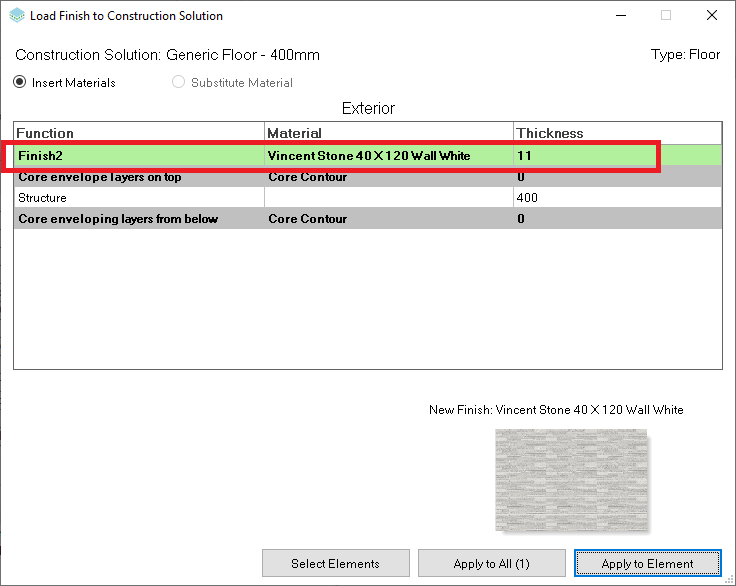
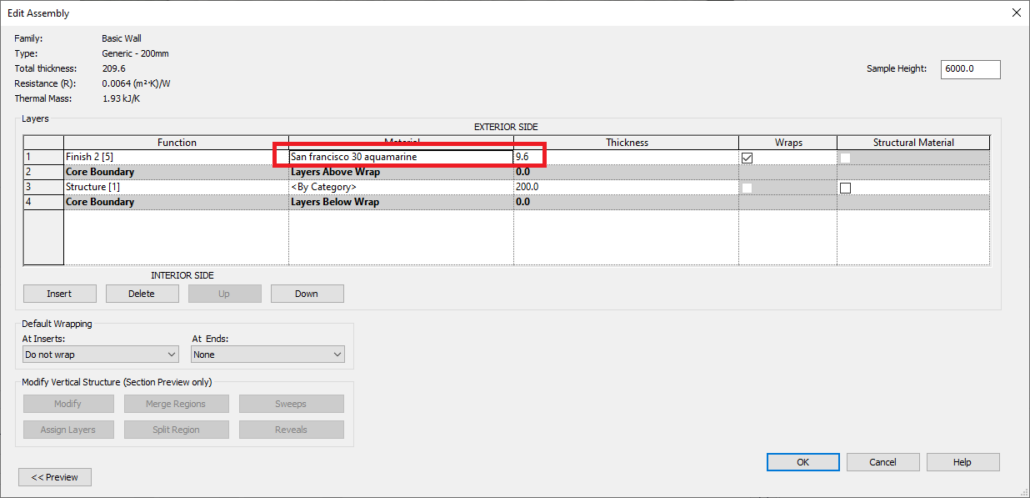
Once the floor is selected, the program detects that the material needs to be added to the floor structure. The thickness of this new layer, which is 11 mm, is automatically determined from the UpdateBIM database, as it is a value provided by the manufacturer.

Since we only have one floor of this type, the button at the bottom displays ‘Apply to All (1)’, along with the option ‘Apply to Element’.

It is important to note that if we had more than one floor of the type ‘Generic Floor – 400mm’, we could use the buttons to assign the material only to the selected element. In that case, the program would request a new name for the type, as it would differ from the rest.

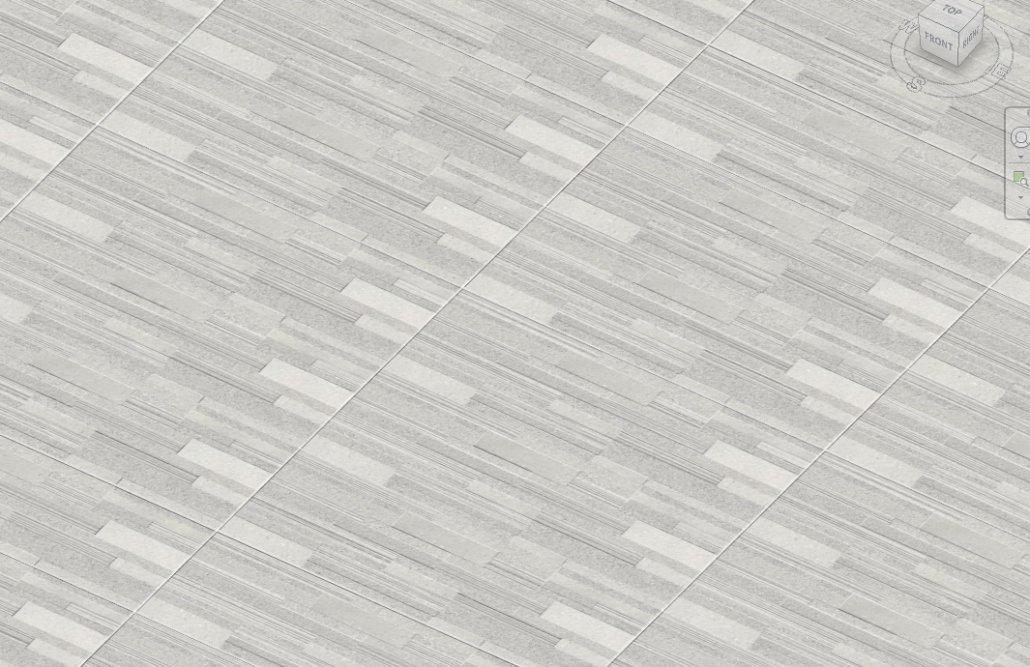
Once the material is applied, switching to the ‘Realistic Finish’ view will allow you to see that the texture is correctly applied, and the effect is quite realistic, thanks to the use of bump mapping and high-quality textures.

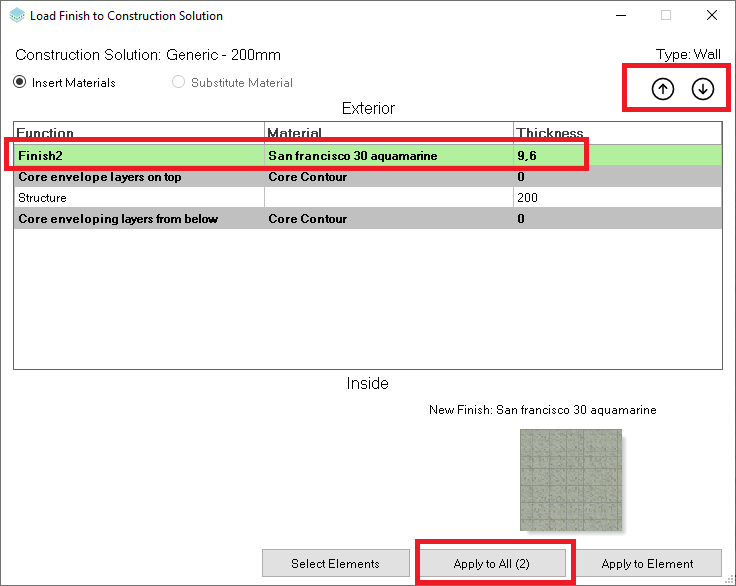
When applying material to a wall, it’s important to note that you can assign a different material to each of its two faces. This allows, for example, using one material on one side and a different material on the other.

An example of this would be a wall with two sections, where each section could have a different material on each side.

If we apply materials directly to the two walls, the result will be:

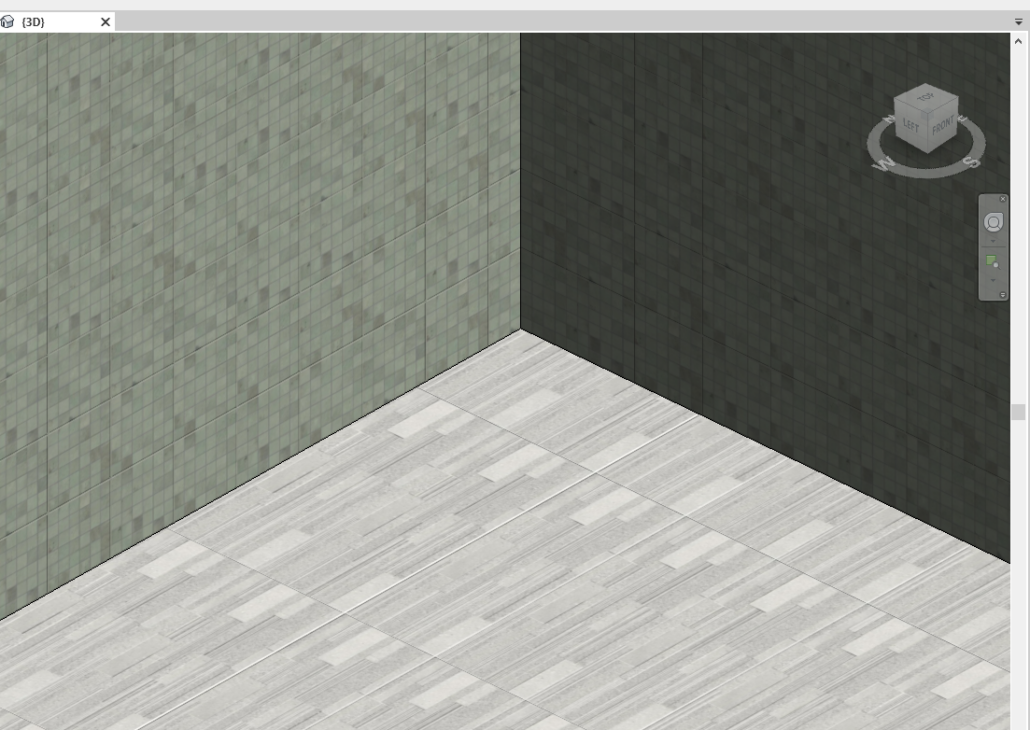
If we analyze the structure of the walls in Revit, we can review how the materials have been applied.

By following these steps, you can effectively manage and apply materials to floors, walls, and roofs, ensuring a realistic and high-quality presentation of your project.

Share This Article :
  • LinkedIn
Still having trouble? How can we help?

How can we help?

Updated on 17 de August de 2024
Add Finishing MaterialsChanging Materials
Tabla de contenidos
  • 1. Prepare the Project:
  • 2. Select the Material from the Catalog:
Acces to UpdateBIM WEB Portal
Privacy & cookies
Legal Notice

Where we are

Maria Teresa González, 26
12005 – Castellón – Spain
+34 964724870
aplicad@aplicad.com

© Copyright - ApliCAD
  • Youtube
  • LinkedIn
  • Mail
Add Finishing MaterialsChanging Materials
Scroll to top